 Loading... Please wait...
Shop all Stores
Compatible
Compatible
- Home
- FAQ (Frequently Asked Questions)
FAQ (Frequently Asked Questions)
Titan Implants — Frequently Asked Questions
USA-Made Dental Implant Attachments | Compatible with All Major Systems | Direct from Manufacturer
Get answers to the most common questions from dentists and dental lab technicians about Titan Implants products, clinical workflows, abutment selection, impression copings, overdenture restorations, ordering, and returns. Can't find what you need? Contact us at (201) 439-0026 or support@titanimplants.com, Monday–Friday, 9am–5pm EST.
We serve dental professionals — dentists and dental laboratory technicians. We do not work directly with patients.
About Titan Implants
What is Titan Implants and what do you make?
Titan Implants, Inc. is a dental implant attachment manufacturer headquartered in Bergenfield, New Jersey, USA. Founded in 2000, we design and manufacture compatible abutments, impression copings, analogs, healing abutments, plastic sleeves, UCLA castable components, bar posts, ball heads, and specialty restorative instruments for virtually every major implant platform on the market. Every product we make is manufactured in our NJ facility — nothing is sourced overseas.
Our guiding principle: "Success Without Expense." Our goal is to help clinicians practice better, longer-lasting implant dentistry on more patients at the lowest possible cost.
Are Titan Implants products FDA-cleared?
Yes. All Titan Implants products are FDA-approved and manufactured in our FDA-registered New Jersey facility under rigorous quality control standards.
What titanium grade do you use?
All Titan Implants implantable components are manufactured from Grade 23 titanium — Ti-6Al-4V ELI (Extra Low Interstitial) — the highest-purity titanium alloy used in implantable medical devices.
Grade 23 ELI is a tightly controlled refinement of the Ti-6Al-4V alloy with significantly reduced levels of oxygen, nitrogen, carbon, and iron compared to standard Grade 5. The result is:
- Superior biocompatibility — lower interstitial content reduces the risk of adverse tissue response, making it the standard for Class III implantable devices
- Higher fatigue strength in physiological environments — critical for components that experience cyclic loading at the bone-implant interface
- Greater ductility and fracture toughness — the alloy deforms before it fractures, providing a margin of safety that standard Grade 5 does not
- Osseointegration-friendly surface chemistry — the cleaner alloy composition supports the titanium oxide layer that drives bone attachment
This is the same alloy specification used in orthopedic implants and pacemaker components. It is not the minimum standard — it is the appropriate standard for any component that contacts bone or soft tissue.
Note: The Titan Implant Locator Pin is a reusable stainless steel instrument (not implanted), which is the appropriate material for an autoclavable chairside and lab tool.
What separates Titan Implants from other dental implant manufacturers?
Five things, consistently:
- Made in the USA. Every component is manufactured at 18 Columbia Ave, Bergenfield, NJ. No overseas production. No weeks-long backorders.
- Direct from the manufacturer. No distributors, no markups, no middlemen. You pay manufacturer pricing.
- One driver, every brand. All Titan Implants compatible abutment titanium screws use a .050" hex drive. One driver covers every platform and brand in our catalog.
- More choices than the OEMs. We offer a broader selection of collar heights (1.0mm–5.5mm in ½mm increments — a Titan exclusive), emergence/profile diameters, and prep heights than most original manufacturers.
- Legacy system support. We continue making quality components for older, discontinued implant systems that other manufacturers have abandoned — keeping long-placed implants restorable.
Compatibility — Which Implant Systems Do You Support?
Which implant brands and systems are your products compatible with?
Titan Implants carries a comprehensive catalog of compatible attachments for all major implant systems, including:
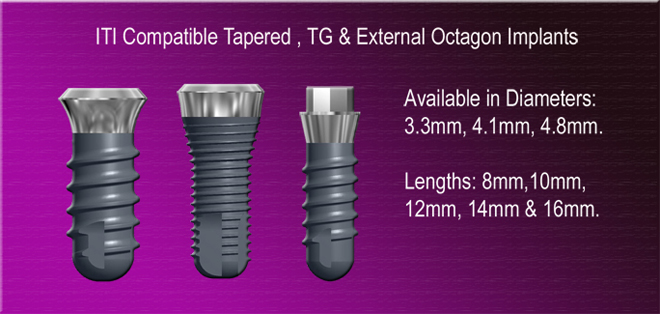
- Straumann — Tissue Level (RN, WN), SynOcta (Internal Octagon), Narrow Neck, Bone Level
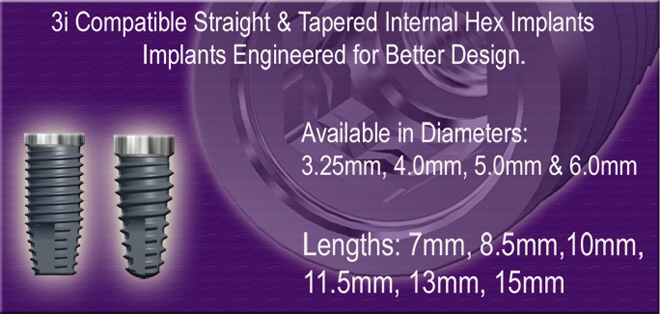
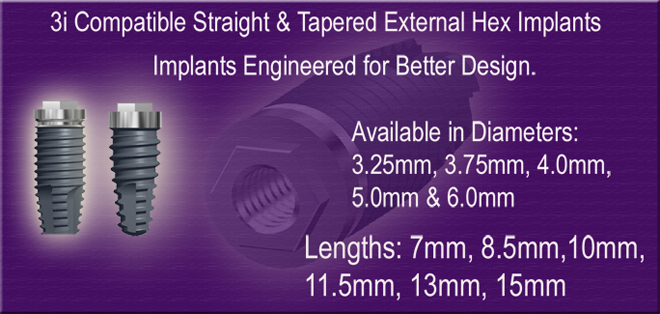
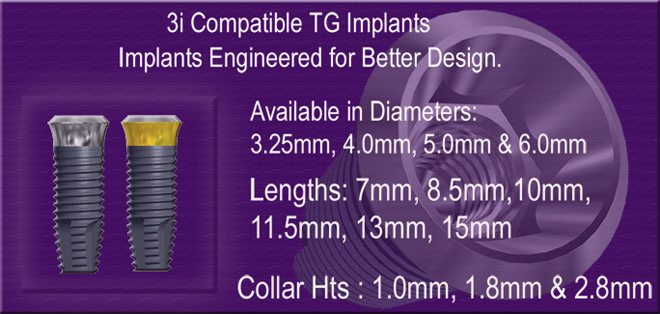
- ZimVie / Biomet 3i — External Hex (3.4, 4.1, 5.0, 6.0mm seating surfaces), Certain Internal Hex, TG Connection
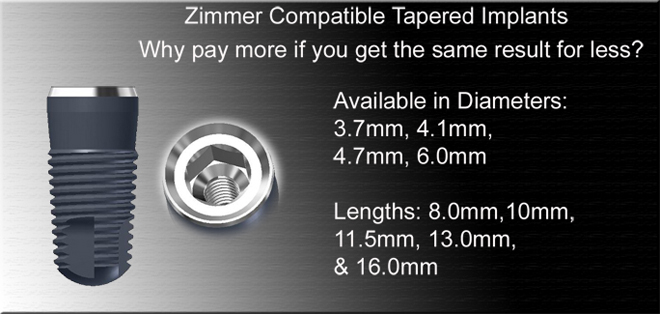
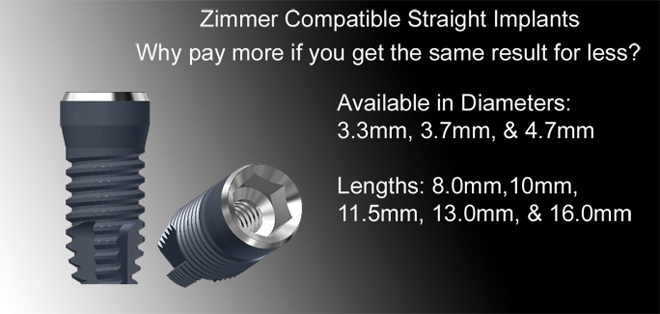
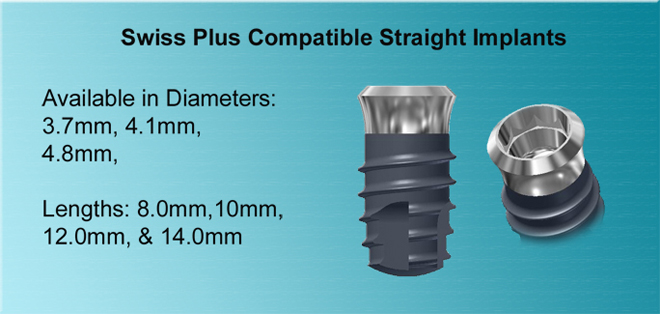
- ZimVie / Zimmer Dental — Screw-Vent, Tapered Screw-Vent (TSV), TSX, Swiss Plus, AdVent, Spline (Calcitek Legacy)
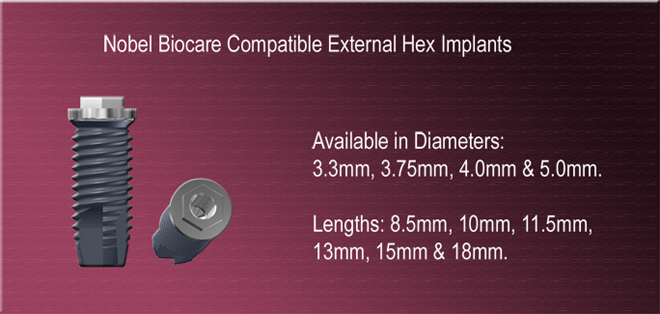
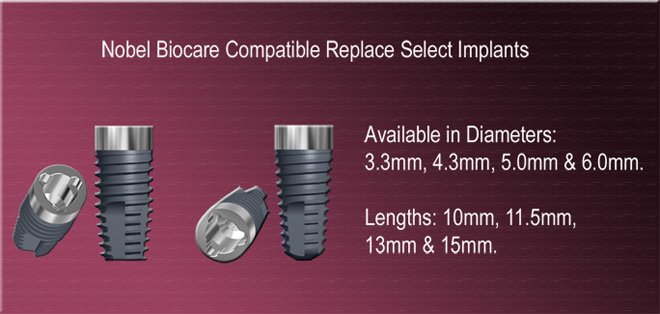
- Nobel Biocare — Brånemark External Hex (NP, RP, WP), Internal Tri-Lobe/Tri-Channel, Multi-Unit, EsthetiCone, Mirus Cone
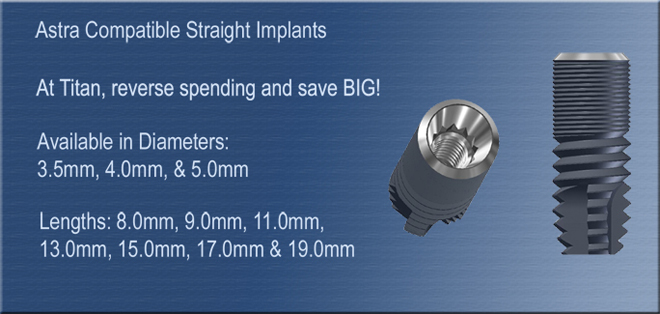
- Astra Tech — Osseospeed TX (including pre-2008 design), EV
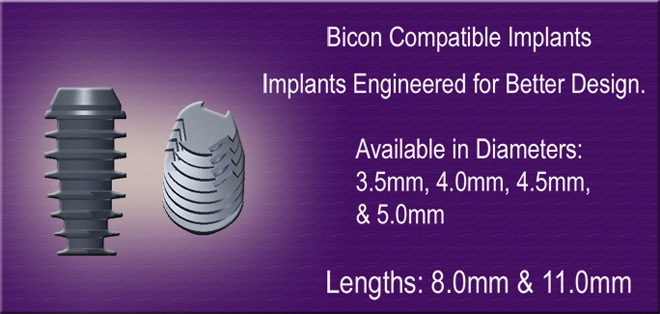
- Bicon — 2.0mm and 3.0mm Well systems
- BioHorizons — External Hex (Maestro), Internal Hex, Internal Single Stage
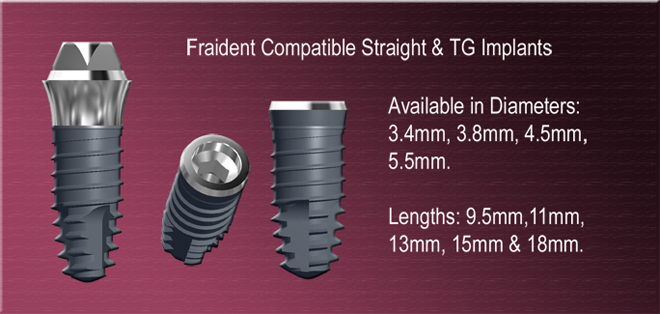
- Friadent / Dentsply — Frialit, XiVE
- Steri-Oss — Flat-Top, HL-Series, Replace, Replace-Select Tri-Lobe, PME
- Calcitek — Spline, Threadloc, Integral, Omniloc
- Core-Vent, BioLok, ADI, Centerpulse, Impla-Med Sterngold, IMTEC, IMZ, and more
If you are unsure whether we carry components for your specific implant, contact Customer Service at (201) 439-0470 with the manufacturer name and implant system.
Do your abutment screws work with all your product lines?
Yes. Every Titan Implants compatible abutment titanium screw is machined with a .050" hex drive — regardless of implant platform or manufacturer compatibility. One driver handles every brand we make.
Do you support older and discontinued implant systems?
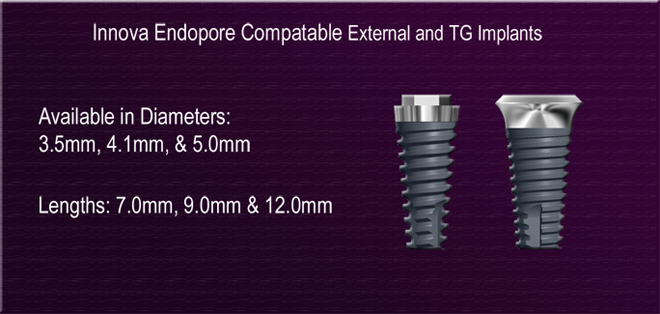
Yes — this is one of Titan's most important advantages. Many patients with implants placed in the 1980s–2000s have implants from systems now discontinued or acquired and discontinued by larger companies. Titan continues to manufacture compatible attachments for legacy systems including Core-Vent, IMZ, Steri-Oss, BioLok, Calcitek Integral/Omniloc, Impla-Med, Paragon Taper-Lock, Innova Endopore, Lifecore, OIC, and others. If you have a patient with an older implant and cannot find parts, contact us — we very likely carry what you need.
Signature Titan Implants Products
What are Titan Implants' signature proprietary products?
Our in-house "Titan Design" lines go beyond compatible equivalents — they add features, improve ergonomics, or simplify clinical workflows:
- Titan Design Solid Abutments with Hexed Top — Straumann RN and WN compatible; hexed collar more than doubles prosthetic retentiveness vs. the traditional single-flat design; deep circumferential groove integral to the transfer system
- Titan Design TG Hex Abutment Kits — Complete 5-piece kits for Biomet 3i TG Connection; available in 4.8mm and 6.5mm platforms
- Titan Implants' Design Simple Step Abutments — Pre-engineered collar/profile/prep-height combinations for Biomet 3i External Hex; eliminates guesswork
- Bicon-Compatible 3.0mm Post Abutments with Octagon Base — Indexed Bicon-compatible posts for repeatable orientation in screw-retained and CAD/CAM workflows
- The Titan Implant Locator Pin — Proprietary stainless steel chairside and lab instrument for abutment/coping placement, parallelism assessment, and custom wax-up
- Straight Locking Implant Abutment Flat with ½mm cuff height increments — Available from 1.0mm to 5.5mm in ½mm steps, a selection range exclusive to Titan Implants
Abutment Selection — Collar Height, Emergence Profile Diameter & Prep Height
What is an emergence profile diameter and how do you select one?
Emergence profile diameter is the width of an abutment at the point where it exits the soft tissue — the diameter of the restorative "root" at the gingival margin.
Selection method:
- Measure the available space between the proximal surfaces of the teeth adjacent to the edentulous space.
- Subtract 2mm — at least 1mm of clearance is required on each side between the abutment flare and adjacent root surfaces.
- The result is your maximum acceptable emergence profile diameter.
- If more than 1mm remains on each side, you may step up to a larger profile level.
Titan offers three emergence profile levels (Level 1, 2, and 3) for each abutment system. General guidance by tooth type:
| Tooth Type | Approximate Profile Diameter |
|---|---|
| Lower incisor | ~3.5mm |
| Upper lateral / lower premolar | ~4.0–4.5mm |
| Upper central / upper premolar | ~5.0mm |
| Molars | ~5.5–6.5mm |
A too-narrow profile creates black triangles; too wide causes blanching, recession, and hygiene problems. When in doubt, start slightly narrower with the healing abutment and allow the tissue to mature before sizing up.
What is a collar height and how do you choose the right one?
Collar height is the transmucosal cuff height — the portion traveling through soft tissue from the implant platform to the gingival margin.
Selection method:
- Probe both the buccal and lingual aspects of the implant site, measuring from the gingival crest to the implant platform.
- Use the larger of the two measurements (buccal is usually deeper).
- Subtract ½ to 1mm to place the restorative margin slightly subgingival.
- Select the closest collar height in the Titan catalog.
If there is a significant buccal-lingual discrepancy, the collar can be modified with a carbide or diamond bur to follow the gingival contour.
Titan Exclusive: Straight Locking Implant Abutments are available in collar heights from 1.0mm to 5.5mm in ½mm increments — finer gradation than any OEM offers — allowing precise tissue-level matching without over- or under-contouring.
Pro tip: Take a tissue model impression using a transfer coping before abutment selection. The master cast replicates soft-tissue contours accurately, letting the lab choose and modify the collar height with full visibility rather than relying solely on clinical probing.
What is a prep height and how do you select it?
Prep height is the titanium height above the gingival margin available for preparation and crown placement. Titan's straight abutment lines offer prep heights of 4.0mm, 5.5mm, and 7.0mm.
Selection method:
- Measure from the gingival crest to the opposing occlusal surface.
- Subtract 3mm (minimum crown material thickness for strength and esthetics).
- Choose the prep height closest to — but not exceeding — this number.
Horizontal reference grooves are machined into all Titan straight abutments to assist height measurement, guide controlled preparation, and significantly increase cement retention while preserving retrievability.
Impression Copings — Types, Selection, and Workflow
What types of impression copings does Titan Implants offer?
Titan supplies two fundamental categories across all major platforms:
1. Implant-Level Impression Copings — attach directly to the implant fixture to capture platform position before abutment placement:
- Open Tray (Direct / Pick-Up) — Long screw extends through a tray hole; coping is captured in the impression. Best for multi-unit cases, long bridges, divergent implants, and deep placements.
- Closed Tray (Indirect / Transfer) — Coping remains in the mouth when the tray is removed; reinserted after. Best for single units and straightforward cases.
2. Abutment-Level Impression Copings — capture the position of an already-seated abutment for the crown impression. Used in two-stage workflows, or when specific abutment geometry requires a dedicated coping (TG Hex Abutment Impression Coping, Straumann SynOcta Abutment Coping, BioHorizons Transmucosal Abutment Impression Coping, and others).
Which impression coping method should I use — open tray or closed tray?
| Situation | Recommended Technique |
|---|---|
| Single-unit posterior implant | Closed tray — simpler, faster |
| Multi-unit bridge or full arch | Open tray — maximum accuracy |
| Deep implant / posterior access | Open tray — easier full seating confirmation |
| Significant implant divergence | Open tray — critical for accurate multi-unit transfer |
| Anterior single unit | Either technique is acceptable |
When in doubt, open tray is more forgiving for complex cases. Use the Titan Locator Pin to verify full coping seating in either technique before the impression material sets.
How do impression copings relate to abutment selection?
The impression coping size should match the healing abutment diameter used during healing — because the healing abutment shapes the peri-implant tissue into the emergence profile of the final restoration. Matching the coping to the healing abutment diameter sends the lab the tissue architecture it needs to select and fabricate the correct abutment and crown.
This is why Titan recommends taking a tissue model impression using a transfer coping before final abutment selection — the cast with tissue contours is the most reliable guide for collar height, emergence diameter, and prep height.
Titan Abutment Impression Coping — Where, When, and How to Use It
What is Titan's Abutment Impression Coping?
A Titan Abutment Impression Coping is a precision-machined, Grade 23 Ti-6Al-4V ELI titanium component that fits over a seated abutment to transfer its exact geometry — shape, height, emergence contour, margin location, and rotational orientation — into the impression and onto the master cast. It is not a plastic cap. It is not discarded after the impression. Across Titan's catalog, every abutment impression coping is designed as a dual-purpose instrument: it first serves as the transfer coping, then is adjusted in the lab to become the final custom abutment itself — eliminating the traditional need for separately purchased gold or milled custom abutments.
As Titan's product documentation states: "Can be used as a transfer and subsequently adjusted in the lab to become the final abutment. Tighter and precise fit. Eliminates extra expense and unnecessary parts. No need for expensive lab-processed gold custom abutments."
Each Titan Abutment Impression Coping comes with a titanium screw and requires a 0.050" hex screwdriver — the same universal driver used across the entire Titan abutment catalog.
Abutment Impression Coping vs. Implant Impression Coping — Why the Difference Matters
This is the most commonly confused pair of components in implant prosthetics. Using the wrong type at the wrong stage produces either a useless impression or one that doesn't give the lab what it needs.
| Implant Impression Coping | Abutment Impression Coping | |
|---|---|---|
| Attaches to | Implant fixture head | Seated abutment |
| Captures | Implant platform position and orientation | Abutment shape, height, margin, and emergence |
| Abutment selection | Happens later, in the lab on the cast | Abutment is already chosen and seated |
| Stage of use | Before final abutment placement | After final or working abutment is seated |
| Lab output | Lab selects/fabricates abutment from scratch | Lab works directly with abutment geometry already in cast |
| Titan dual-use option | No | Yes — coping becomes the final abutment after modification |
Using an implant-level coping when the abutment is already seated loses all tissue contour and margin information. Using an abutment impression coping before the abutment is placed gives the lab nothing to work with. Matching the coping type to the treatment stage is the foundation of an accurate impression.
WHERE — Which Systems and Abutments Use a Titan Abutment Impression Coping?
Titan offers abutment impression copings for the following systems:
| System | SKU | Technique | Notes |
|---|---|---|---|
| Straumann SynOcta 4.8mm RN | ITI-48SOIAC | Closed tray | Impergum recommended |
| Straumann SynOcta 6.5mm WN | ITI-65SOIAC | Closed tray | Impergum recommended |
| Straumann 4.8mm Screw-Retained Abutment | IS-48IAIC | Open tray | Long screw |
| Friadent / XiVE 4.5mm | F-45AIC | Closed tray | |
| Friadent / XiVE 5.5mm | F-55AIC | Closed tray | |
| Zimmer Swiss Plus 4.8mm Intermediate Abutment | ZSP-48IAIC | — | Transmucosal abutment coping — not an implant coping |
| IME / UMA Abutment | TN-UMAIC | Open tray | Long screw |
| Calcitek Integral / Omniloc Shouldered Abutment | See catalog | Long screw | |
| Titan Design TG Hex Abutment 4.8mm | Included in TG kit | Open tray | Part of complete 5-piece kit |
| Titan Design TG Hex Abutment 6.5mm | Included in TG kit | Open tray | Part of complete 5-piece kit |
Instructional videos for Straumann-compatible and Friadent-compatible abutment impression coping workflows are at titanimplants.com/educational-videos/
WHEN — Stage of Treatment and Clinical Indications
Use the Abutment Impression Coping at the definitive restoration appointment, after:
- Osseointegration is confirmed
- The definitive or working abutment is selected, seated, and torqued to specification
- Soft tissue has matured around the emergence profile — typically 4–8 weeks after healing abutment removal
- The clinician is ready for the definitive crown or bridge impression
Use it in preference to an implant-level impression when any of the following apply:
- A stock abutment is already fully seated and you want to capture crown-ready geometry without an extra abutment fabrication step
- The implant system uses a tissue-level abutment connection (Straumann SynOcta, Friadent standard abutment) where the restorative interface is above the gingiva and abutment-level impressions are the standard protocol
- You want to eliminate the separate custom abutment cost and lead time by using the Titan dual-use approach
- The emergence profile has been shaped by a healing abutment and you want the impression to capture the matured soft-tissue architecture around the seated definitive abutment
- A screw-retained intermediate abutment (Zimmer Swiss Plus, BioHorizons transmucosal) is placed and an abutment-level impression is needed to capture the abutment-to-crown relationship accurately
Do not use it:
- At the surgical placement appointment
- During the healing phase (use a healing abutment)
- For multi-unit implant-level impressions where abutment selection will happen in the lab (use an implant-level impression coping)
- When the abutment has not yet been chosen or seated
HOW — Complete Step-by-Step Workflow
Chair-side (Dentist)
-
Confirm implant access — use the Titan Implant Locator Pin to locate the implant connection, especially in posterior sites with restricted visibility. Thread the Locator Pin by hand; its serrated handle gives secure control without a driver.
-
Seat the Abutment Impression Coping — the method differs by coping type:
- For copings with a central screw bore that seat directly into the implant: thread the Locator Pin into the implant first, slide the coping down over the pin — the snug head fit holds it in correct orientation — then remove the pin and thread the included titanium screw by hand.
-
Verify seating — confirm the coping is fully seated by checking it is flush to the abutment collar on all sides. Any rocking or gap will introduce error into the master cast.
-
Take the impression — the recommended technique depends on the coping type:
- SynOcta Abutment Impression Coping (ITI-48SOIAC, ITI-65SOIAC): closed-tray impregum or high-viscosity polyether impression. Titan's single-piece transfer copings are specifically designed for this technique.
- Open-tray systems (IME/UMA, Screw-Retained Abutment, TG Hex): use a fenestrated tray; the long screw exits through the tray hole and is loosened after the impression material sets.
-
Remove the tray —
- Closed tray: the coping remains on the abutment. Unscrew it and re-seat it precisely into the void left in the impression material.
- Open tray: the coping is captured in the impression; remove the tray with the coping embedded.
-
Return the coping to the patient's abutment (closed tray) or leave it in the impression (open tray) and attach the abutment analog. Send both to the lab.
Lab (Dental Technician)
-
Attach the matching abutment analog to the impression coping in the impression — the analog replicates the abutment geometry on the cast.
-
Pour the master cast with the coping seated on the analog. When the stone sets, the coping is now embedded in the cast at the exact geometry and position of the abutment in the patient's mouth.
-
Assess the coping on the cast — evaluate prep height clearance, emergence profile relative to the soft tissue model, and margin depth on both the buccal and lingual aspects.
-
Modify the Abutment Impression Coping as the final abutment — this is the dual-use step that eliminates the separate custom abutment:
- Using carbide or diamond burs, reduce the prep height to the correct dimension (reference the horizontal grooves machined into the chimney — they serve as measurement markers and remain after modification to provide cement retention)
- Shape the emergence profile to match the soft tissue contour, creating a natural exit profile from the implant platform
- Refine the margin to the correct subgingival depth on the cast
- Polish all modified surfaces
-
Fabricate the crown directly over the modified abutment impression coping on the master cast. The horizontal grooves that remain after modification significantly increase cement retention while still allowing retrievability.
-
Return the modified coping as the final abutment with the crown at the seating appointment.
At the Seating Appointment (Dentist)
- Seat the modified abutment impression coping (now the final abutment) in the implant and torque to specification.
- Trial fit the crown; verify margins, occlusion, and contacts.
- Cement or screw-retain per the restoration design.
No separate "abutment delivery appointment" is needed — the implant impression, abutment fabrication, and crown fabrication are collapsed into a single lab cycle.
Why This Workflow Saves Time and Money
| Traditional Approach | Titan Abutment Impression Coping Approach |
|---|---|
| Implant impression coping (purchase 1) | Abutment Impression Coping (purchase 1) |
| Custom abutment or UCLA casting (purchase 2) | Not needed — coping becomes the abutment |
| Gold custom abutment fee at lab | Eliminated |
| Separate abutment seating appointment possible | Single impression-to-crown lab cycle |
| Fit discrepancy risk between abutment and crown | Single piece — impression accuracy transfers directly |
The approach directly embodies Titan's "Success Without Expense" principle: the same precision component does double duty, cutting both the parts cost and the clinical-to-laboratory cycle time without compromising fit accuracy.
How the Titan Locator Pin Optimizes the Abutment Impression Coping Workflow
The abutment impression coping's threaded titanium screw receptacle accepts the Locator Pin before the screw is placed, enabling two critical pre-seating steps:
- Guided seating in restricted access (direct-implant copings only) — for copings with a central screw bore that seat directly into the implant (Friadent/XiVE, IME/UMA, TG Hex types): thread the Locator Pin into the implant first, slide the coping down over it into position, then swap the pin for the titanium screw. No driver needed for the placement step, no risk of dropping the screw, no cross-threading. Note: this technique does not apply to SynOcta copings used over a pre-seated solid abutment — the solid abutment has no bore and blocks the implant connection once seated.
- Angulation and axis assessment — with the Locator Pin inserted into the abutment's top-surface receptacle (for solid abutments) or through the coping into the implant (for direct-implant copings), the pin handle gives an immediate visual reference of the implant axis — confirming whether the abutment will seat on-axis or will need modification before the impression is taken.
The Titan Implant Locator Pin — Complete Workflow Guide by Abutment Type
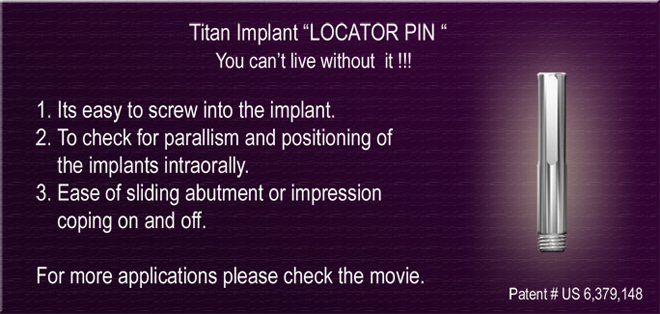
What is the Titan Implant Locator Pin?
The Titan Implant Locator Pin is a straight, threaded stainless steel pin with a serrated finger handle — a Titan proprietary instrument designed to separate the "orient and seat" step from the "fasten and torque" step in every abutment and impression coping placement. It is autoclavable, reusable, and available in thread types matched to the most popular implant systems.
Available SKUs:
| SKU | Thread | Primary Compatible Systems |
|---|---|---|
| M1.6-ILP-22 | Metric M1.6 | Nobel Brånemark NP (3.3mm), Friadent/XiVE |
| M2-ILP-20 | Metric M2 | Various M2-thread implant systems |
| M2.5-ILP | Metric M2.5 | Various M2.5-thread implant systems — see titanimplants.com/implant-locator-pins/ for full list |
| 1-72-ILP-22 | 1-72 UNF | ZimVie / Zimmer Screw-Vent, TSV, TSX |
Full SKU list by implant system: titanimplants.com/titan-implants-locator-pins/
Why it was designed: Placing a small-diameter screw accurately into a deep posterior implant with restricted access and impaired visibility is one of the most error-prone moments in implant restorations. The Locator Pin replaces the screw for the seating step — it's larger, has a grippable handle, threads by hand without a driver, and holds any coping or abutment snugly via the precision-fit head. Once the component is oriented and seated, the pin is swapped for the titanium screw in seconds.
Locator Pin Use — Straight Locking Implant Abutment Flat
The Straight Locking Implant Abutment Flat is Titan's most widely used abutment — available for all major platforms, in cuff heights from 1.0mm to 5.5mm in ½mm increments (Titan exclusive), with a wide range of emergence profile diameters. Horizontal grooves assist in height measurement and significantly increase cement retention.
Chair-side with Locator Pin:
- Select the correct collar height, emergence profile, and prep height using the selection method in this FAQ.
- Thread the Locator Pin by hand into the implant — the serrated handle provides secure grip even in a restricted posterior arch.
- Slide the abutment down over the pin; the flat anti-rotation feature self-aligns.
- Confirm angulation visually — the pin handle projecting from the abutment gives an immediate axis reference.
- Remove the pin; seat and torque the abutment screw to spec.
Lab with Locator Pin:
- Insert the appropriate Locator Pin into the implant analog on the master cast to verify axis and confirm the selected abutment will seat correctly before fabricating the crown.
- Use the pin as a prep-height reference guide during height measurement with the horizontal grooves.
Minor angle correction: Per Titan's documented clinical guidance, inserting Locator Pins into multiple implants simultaneously allows visual confirmation that straight abutments are viable — and minor angular discrepancies can often be managed with straight abutments when the pin assessment confirms sufficient parallelism.
Locator Pin Use — Simple Step Abutment (Biomet 3i External Hex)
The Simple Step Abutment's defined three-dimensional geometry (collar height / emergence profile / prep height) means the right part selection before placement is everything. The Locator Pin is the validation tool that confirms the selection will work before you commit.
Before ordering — parallelism check:
- At the post-healing appointment, insert Locator Pins into each implant in the case.
- Assess parallelism — if the divergence is within the acceptable range for straight abutments, proceed with Simple Step selection; if not, plan for angular management.
Chair-side placement:
- Thread the Locator Pin into the implant.
- Slide the Simple Step Abutment over the pin — the external hex self-aligns.
- Confirm the collar depth is at the intended tissue level; if the collar emerges too high, reassess collar height selection.
- Remove the pin; seat and torque the abutment screw.
Locator Pin Use — Abutment Impression Coping (Straumann RN/WN, Friadent XiVE)
(See the dedicated Abutment Impression Coping section above for the full workflow.)
In summary: the Locator Pin workflow for abutment impression copings depends entirely on how the coping attaches to the implant. For copings with a central screw bore that seat directly into the implant (Friadent, IME/UMA, TG Hex types), the Locator Pin threads into the implant first and the coping slides over it — no driver needed, no dropped screws. For SynOcta-type copings that seat over an already cold-welded one-piece solid abutment, the Locator Pin is used only before the solid abutment is cold-welded: it threads into the solid abutment's top-surface receptacle to assess angulation. Once the solid abutment is seated, the implant connection is blocked and the Locator Pin cannot enter the implant from above.
Locator Pin Use — Bar Post Abutment
Bar post abutments are non-engaging cylindrical Grade 23 Ti-6Al-4V ELI posts that thread into the implant and are laser-welded to titanium bars to form all-titanium overdenture bar and bridge frameworks. Each bar post comes with a titanium screw.
The laser-welding technique eliminates casting, waxing, investing, and finishing — making it one of the most economical and accurate lab frameworks available.
Parallelism check with Locator Pins (critical for bar cases): Bar post implants require far more precise parallelism than single-crown cases — the bar itself cannot flex to compensate for divergent posts. Before any lab work:
- Insert Locator Pins into all implants in the bar case simultaneously.
- Assess parallelism visually and with a surveyor if needed.
- Determine whether any posts will need to be angled, or whether the bar design must compensate for divergence.
- Document pin positions for the lab with a photograph or impression — this is the reference the lab will use to set bar height.
Chair-side placement:
- Thread the Locator Pin into each implant by hand.
- Slide the bar post down over the pin; remove the pin and seat the titanium screw.
- For multi-implant bar cases, work systematically implant by implant — do not fully torque any post until all posts are hand-seated and alignment is confirmed.
Locator Pin Use — Multi-Unit Abutments
Multi-unit abutments (transmucosal screw-retained abutments for full-arch and bridge cases) require the highest parallelism accuracy of any abutment type. Even small angular discrepancies are magnified across a full arch.
Pre-treatment planning with Locator Pins: Insert Locator Pins into all implants before treatment planning begins. The pin array gives the most direct visual map of the implant axis distribution — identifying which implants will require angled multi-unit abutments, and what angulation is needed before the abutments are ordered.
Chair-side placement:
- Thread the Locator Pin into the implant; slide the multi-unit abutment over the pin to confirm it engages the internal connection correctly before threading the abutment screw.
- Torque multi-unit abutments to the manufacturer's specification for the implant system — typically 35Ncm for most platforms; confirm from the implant system's documentation.
Titan Abutment Types — Product Reference Guide
Straight Locking Implant Abutment Flat — Full Details
Titan's most widely-used preparable abutment. Precision-machined for consistent, accurate fit that helps eliminate micro-movement at the implant-abutment interface.
Key features:
- Cuff heights 1.0mm to 5.5mm in ½mm increments — Titan exclusive; no OEM offers this resolution
- Wide range of emergence profile diameters for natural restorations
- Horizontal grooves: height measurement reference + significantly increased cement retention + retrievability
- Available for all major brands (Nobel, 3i/Biomet, Astra, Friadent XiVE, Straumann, Zimmer) and legacy systems (Paragon Taper-Lock, Innova Endopore, Straumann Narrow Neck, Biolok, Brånemark, Lifecore, OIC, Steri-Oss, IMTEC)
Locator Pin use: Thread pin into implant → slide abutment over pin → confirm angulation → swap pin for titanium screw.
Titan Design Solid Abutment with Hexed Top (Straumann Compatible) — Full Details
A Titan-engineered upgrade to the Straumann solid abutment for Tissue Level RN and WN platforms.
Key features:
- Hexed collar that more than doubles prosthetic retentiveness vs. flat-sided abutments
- Deep circumferential groove above the hex: additional retentiveness + integral part of the transfer system
- Internally threaded top surface receptacle: accepts inserting screw, Locator Pin, or can be used to construct very retentive fixed detachable cases on Straumann implants
- Requires socket wrench + hand tightening tool (achieves >20Ncm by hand); also compatible with torque wrench
- Single-piece transfer copings included; optimized for closed tray impregum impression
- Best modified when implants are non-parallel
Locator Pin use: Insert Locator Pin into the top-surface receptacle to carry the abutment to the implant and judge angulation corrections before final seating.
Titan Design Simple Step Abutment (Biomet 3i External Hex) — Full Details
Pre-engineered three-dimensional abutment selection for 4.1mm and 5.0mm External Hex platforms. Available in calibrated collar height / profile diameter / prep height combinations.
Selection:
- Profile diameter: Measure proximal space, subtract 2mm → max profile. Choose Level 1, 2, or 3.
- Collar height: Measure gingival depth (buccal and lingual), use larger, subtract ½–1mm. Choose closest.
- Prep height: Measure gingival crest to opposing occlusion, subtract 3mm. Choose prep height ≤ result.
Pro tip: Take a tissue model impression using a transfer coping for the most accurate abutment selection — the lab can then select and modify from the cast.
Titan Design TG Hex Abutment Kit (Biomet 3i TG Connection) — Full Details
Complete restoration kit for 3i TG (Tissue-Generation) tapered internal connection implants. Available in 4.8mm and 6.5mm platforms.
Kit includes: TG Hex Abutment, TG Hex Abutment Driver, TG Hex Abutment Analog, TG Hex Abutment Impression Coping (open tray), TG Hex Abutment Plastic Sleeve.
Workflow: Seat abutment with dedicated TG driver (indexed hex) → take impression with TG Hex Impression Coping → pour cast with TG Hex Analog → fabricate on analog using plastic sleeve for custom casting or scan for CAD/CAM. Do not substitute standard External Hex or Certain components on TG implants.
Modifiable Abutment — Full Details
A pre-machined Grade 23 Ti-6Al-4V ELI abutment with intentionally added material (bulk) designed to be custom-reduced chair-side or in the lab. Choose when:
- A custom subgingival margin placement is required
- The implant axis needs angular correction beyond a stock geometry's capability
- The emergence must be sculpted to match a specific tooth
vs. Straight Locking Abutment Flat: Stock abutment when the case fits standard geometry; modifiable abutment when it doesn't.
Bicon Compatible Shouldered Post Abutment — Full Details
Titan's Bicon-compatible abutments restore 3.0mm well implants (4.5mm, 5.0mm, and 6.0mm diameter, including Bicon SHORT® implants) using the system's defining 1.5° locking-taper cold-weld connection. There is no anti-rotation feature in the Bicon implant — abutments can be seated at any rotational position (true 360° universal positioning), giving complete freedom to optimize emergence profile and margin placement without rotational constraints.
Important: 2.0mm post abutments are for anterior positions only. Use 3.0mm posts for all posterior restorations.
When should I choose a Titan Bicon-compatible Shouldered Post Abutment vs. a Non-Shouldered Post Abutment?
Shouldered Post Abutment (BC-3PA / Titan Design with Octagon Base BC-3A-PA)
The shouldered design incorporates a machined flare — the shoulder — at the base of the prep chimney. This shoulder:
- Establishes a definitive margin for the crown with no ambiguity for the lab
- Creates emergence support that shapes and holds peri-implant soft tissue for a natural exit profile
- Features horizontal reference grooves in the chimney that serve as height measurement guides, significantly increase cement retention, and allow retrievability
- Has an internal chimney thread to carry the abutment to the implant on the long screw — no hemostat needed
- Supports both cement-retained and screw-retained crowns
The Titan Design version (BC-3A-PA) adds an octagon base providing eight indexed seating positions (every 45°) for multi-unit cases, screw-retained restorations, and CAD/CAM workflows where orientation must transfer reproducibly between mouth and cast.
Choose the Shouldered Abutment when:
- The case needs a defined, predictable restorative margin without full custom lab fabrication
- Natural emergence profile support from a stock part is appropriate
- Cement retention and retrievability are clinical priorities
- The tissue depth, tooth size, and inter-occlusal space fall within available stock dimensions
Non-Shouldered Post Abutment (BC-3572NSPA)
A straight, tapered cylindrical post with no built-in flare or margin. The emergence profile, shoulder geometry, and margin location are entirely created by the lab through modification of the post blank.
Choose the Non-Shouldered Abutment when:
- The required emergence profile or margin location cannot be achieved by any stock shouldered dimension
- Unusual tissue anatomy — extreme depth, asymmetric gingival architecture, or an atypical ridge form — demands a fully custom contour
- A highly experienced lab technician will fabricate the abutment entirely from the post blank
- Maximum modifiable flexibility is the overriding priority
The non-shouldered design takes more lab time and expertise than the shouldered option. For straightforward cases that fit stock dimensions, the shouldered abutment is more efficient and more predictable.
How do I select collar height, profile diameter, and prep height for a Bicon-compatible Post Abutment?
Post Size — First Decision
| Post Size | Appropriate Use |
|---|---|
| 2.0mm post | Anterior teeth ONLY |
| 3.0mm post | All positions; all posterior teeth; implant diameters 4.5–6.0mm |
Collar Height (vertical distance from implant platform to the shoulder margin)
Bicon implants are typically placed at or slightly below the bone crest. The collar height must bridge from the implant platform through the bone and soft tissue to the desired margin location.
- Probe from the gingival crest down to the implant platform at both the buccal and lingual aspects.
- Use the greater of the two measurements — the buccal is usually deeper.
- Subtract ½ to 1mm to place the restorative margin slightly subgingival.
- Choose the closest available collar height in the Titan Bicon catalog.
If buccal and lingual depths differ significantly and a scalloped margin is desired, the shoulder can be contoured with a carbide bur to follow the gingival architecture.
Pro tip: The most accurate collar height comes from a tissue model impression taken with a transfer coping before abutment selection — the cast replicates tissue contour exactly, letting the lab choose and modify from a physical model rather than relying on probing measurements alone.
Profile (Emergence) Diameter (abutment width at the gingival exit point)
Because the Bicon system has no rotational anti-rotation feature, profile diameter can be optimized purely for tooth morphology and tissue contour — a significant esthetic advantage over hex-indexed systems.
- Measure available space between adjacent root surfaces at the edentulous site.
- Subtract 2mm — minimum 1mm clearance per side between the abutment flare and adjacent root.
- Match to the natural tooth type:
| Tooth Type | Typical Profile Diameter |
|---|---|
| Lower incisor | ~3.5mm |
| Upper lateral / lower premolar | ~4.0–4.5mm |
| Upper central / upper premolar | ~5.0mm |
| Molars | ~5.5–6.0mm |
A profile too narrow collapses the tissue and creates black triangles; too wide blanches the tissue and risks recession and hygiene problems.
Prep Height (length of the restorative chimney above the shoulder)
Available: 4.0mm, 5.5mm, and 7.0mm.
- Measure from the gingival crest to the opposing occlusal surface.
- Subtract 3mm — minimum crown material thickness required.
- Choose the prep height that does not exceed this value.
If inter-occlusal space is limited, choose the shorter prep height and review space management with the restorative team before placing the abutment.
Quick Reference — Shouldered vs. Non-Shouldered
| Clinical Situation | Shouldered | Non-Shouldered |
|---|---|---|
| Defined restorative margin needed | ✓ Preferred | — |
| Cement retention and retrievability | ✓ Preferred | — |
| Screw-retained crown option | ✓ (chimney thread) | Lab-dependent |
| Fully custom emergence contour | — | ✓ Preferred |
| Extreme tissue depth or atypical anatomy | — | ✓ Preferred |
| Maximum lab efficiency | ✓ Faster | Requires more time |
| CAD/CAM indexed workflow | ✓ (Octagon Base version) | Not indexed |
Important: 2.0mm post abutments are for anterior positions only.
Ball Head Abutments — Overdenture Retention
What is a Ball Head Abutment and when should I use it?
A ball head abutment is an industry-standard direct-retention overdenture component — it is not unique to Titan Implants. Ball head abutments thread directly into the implant; the patient's denture base contains a female o-ring keeper (metal housing) that snaps onto the ball head and retains the overdenture. The o-ring keeper is processed into the denture base chair-side or in the lab.
What distinguishes Titan's offering is breadth of coverage: Titan carries ball head abutments for almost every major implant system on the market, all manufactured in our NJ facility from Grade 23 Ti-6Al-4V ELI at direct-from-manufacturer pricing.
Ball head overdentures are ideal for edentulous or partially edentulous patients who need a cost-effective, removable, retentive overdenture — particularly patients who cannot afford or tolerate a more complex bar or implant-supported fixed restoration.
Technical requirements:
- Minimum 6mm inter-occlusal clearance (including cuff height)
- Implants must be relatively parallel — less than 10 degrees total divergence
- Requires the Titan Ball Head Wrench for seating and torquing
Implant systems supported: Lifecore Restore External Hex, Nobel Brånemark, Nobel Internal Tri-Channel, Zimmer Tapered Screw-Vent, Calcitek, Steri-Oss, Astra-Tech TX, Imtec External Hex, Innova Endopore/Entegra, Straumann Tissue Level RN, Biomet 3i (TG, External Hex, Internal Hex), IMZ Original and Interpore External Hex, and more. See the full list at titanimplants.com/implant-systems-compatibles/.
Instructional videos: titanimplants.com/educational-videos/ (Videos 3 and 4)
How does the Locator Pin work with Ball Head Abutments?
Ball head abutments require near-parallel implant placement. Insert Locator Pins into all implants simultaneously before committing to ball head selection — if divergence exceeds 10 degrees, the ball head o-ring will not engage and disengage cleanly and the patient will experience poor retention and accelerated o-ring wear. In those cases, plan for angled abutments, a bar restoration, or discuss the angulation with the surgical team.
Bar Post Abutments — Laser-Welded Bar Frameworks
What is a Bar Post Abutment and what is it used for?
Bar post abutments are Grade 23 Ti-6Al-4V ELI non-engaging cylindrical posts that thread directly into the implant and are laser-welded to titanium bars to create all-titanium bar and bridge frameworks for implant-supported overdentures and fixed detachable restorations. Each bar post comes with a titanium screw.
Titan's bar posts are very economical, accurate, and durable, and provide direct and fast fabrication of hader bar and clip denture restorations. The laser-welding technique eliminates the need for casting, waxing, investing, and finishing steps — significantly reducing lab time and cost.
Ideal bar framework design: Hader bar with retentive clips in the anterior; locking pin attachments distally for support and stability. Most implant bar restorations use a minimum of two to five implants.
Supported implant systems: Biomet 3i (External Hex, Internal Hex, IOL, Conical Abutment), Nobel Biocare (Brånemark, Internal Tri-Channel, Multi-Unit), Zimmer Dental (Tapered Screw-Vent, Screw-Vent, Advent, Spline), Steri-Oss Replace and HL Series, Friadent XiVE, IMTEC, BioHorizons, Keystone Dental Restore External Hex, and more.
Instructional video: titanimplants.com/educational-videos/ (Video 8)
How does the Locator Pin optimize bar post placement?
Parallelism is the most critical variable in a bar case — divergent bar posts produce a bar that either cannot be laser-welded accurately or creates a passive-fit problem that leads to screw loosening and framework fatigue. Use Locator Pins in every implant before committing to bar post selection:
- Insert all Locator Pins simultaneously; photograph or take an impression with pins in place for the lab.
- Use a parallelometer or surveyor if needed to quantify divergence.
- If divergence requires compensation, confirm with the lab before placing bar posts — they may need to adjust welding angles or use angled posts.
- At placement: thread pin → slide post over pin → remove pin → seat titanium screw hand-tight → move to next implant; torque all posts only after all are seated and confirmed parallel.
Multi-Unit Abutments — Full Arch and Bridge Restorations
What are Multi-Unit Abutments and when do I use them?
Multi-unit abutments (also called screw-retained intermediate abutments or transmucosal abutments) are screw-retained, angulated abutments designed to support full-arch fixed prostheses — All-on-4, All-on-6, hybrid dentures, and implant-supported bridges. They create a consistent emergence platform at or above the gingival level, with the prosthesis attaching to the abutment rather than directly to the implant.
Multi-unit abutments are the foundation of modern full-arch implant dentistry. Titan offers complete multi-unit systems for:
- Zimmer Tapered Screw-Vent
- Straumann Tissue Level RN
- Nobel Biocare Brånemark
And multi-unit restorative components (abutment analog, abutment impression coping, abutment waxing sleeve, abutment bar post) for:
- 3i Conical Abutment, Sterioss PME and Conical, Lifecore External Hex Conical, Calcitek Shouldered, Straumann RN Screw-Retained, Astra TX UniAbutment (bar post), Nobel EsthetiCone, Nobel Multi-Unit, Core-Vent TSI, and ImplaMed Low Margin Conical Standard.
Why is the Locator Pin especially important for multi-unit cases?
Full-arch multi-unit restorations have zero tolerance for angulation errors — a framework that doesn't achieve passive fit creates screw loosening, fracture, and bone loss. Using Locator Pins at every stage of multi-unit planning and placement is not optional, it's standard practice:
- At planning: Confirm implant axis before ordering multi-unit abutment angulations
- At abutment selection: Verify which implants need 0°, 17°, or 30° abutments
- At placement: Confirm all abutments are seated fully before torquing
- In the lab: Verify analog orientation in the cast before framework fabrication
Healing Abutments — Tissue Maturation and Emergence Shaping
What is a healing abutment and why does it matter?
A healing abutment (also called a healing cap or tissue former) is temporarily placed on the implant after placement or second-stage surgery to shape the peri-implant soft tissue into the correct emergence profile for the final restoration — and to prevent tissue from collapsing over the implant platform during healing.
Choosing the correct healing abutment diameter and height directly determines the tissue architecture the final crown will emerge from. A healing abutment that is too narrow results in tissue collapse and the need for a second surgery or tissue grafting; one that is too wide creates blanching, recession, and long-term hygiene problems.
Titan's healing abutments are available in flared designs (for smooth emergence from implant to crown) and parallel-sided designs (for narrow-diameter teeth). The diameter selected at the healing stage should match the final emergence profile diameter of the definitive abutment — because the tissue forms around whatever healing abutment is placed.
How do I select the correct healing abutment size?
Select the healing abutment diameter to match the anticipated final crown's CEJ (cemento-enamel junction) diameter — not the implant platform diameter. A 4.1mm implant restoring a molar may need a 5.5–6.5mm healing abutment; the same implant restoring a premolar may need a 5.0mm healing abutment.
Select the height to place the top of the healing abutment 1–2mm above the gingival crest — enough to be easily locatable at the second appointment, but not so tall that it interferes with occlusion during healing.
UCLA Plastic Sleeves and Custom Abutment Castings
What is a UCLA Plastic Sleeve and when do I use it?
A UCLA plastic sleeve (also called a plastic castable coping) is a wax-compatible, castable plastic sleeve that engages the implant connection — hex or non-hex — and allows the lab to wax up and cast a completely custom abutment in metal (gold alloy, cobalt-chrome, or titanium) or process a custom pressed ceramic over the metal foundation.
UCLA sleeves are used for:
- Custom-cast metal abutments for unusual angulations or emergence profiles not available in stock parts
- Gold cylinder bases for porcelain-fused-to-metal screw-retained crowns
- Bar and bridge frameworks in conjunction with bar posts
- Provisionals requiring a custom titanium or metal base
Titan offers hex (anti-rotation) and non-hex (free rotation) versions of UCLA sleeves for all major platforms. Use the Titan Implant Locator Pin as the wax-up reference post — slide the plastic sleeve over the pin on the analog, wax to the desired gingival height, and proceed to casting or scanning.
What is a Titanium Base Abutment (Ti-Base) and why use one for zirconia restorations?
A Titanium Base Abutment (Ti-Base) is a precision-machined Grade 23 Ti-6Al-4V ELI abutment with a flat top surface that provides a titanium bonding interface for zirconia crowns and bridges. Rather than bonding zirconia directly to the implant, a Ti-Base is torqued into the implant and the zirconia crown is bonded to the titanium surface using adhesive resin cement.
Ti-Bases solve the key problem with all-zirconia abutments: zirconia-to-titanium bonding at the implant connection is mechanically unreliable. A Ti-Base provides a superior, tested bonding surface for zirconia while the critical implant-abutment interface remains titanium-to-titanium.
Titan offers Ti-Base abutments for Biomet 3i External Hex, Certain Internal Hex, Zimmer Screw-Vent/TSV/TSX, BioHorizons Internal Hex, Nobel Tri-Lobe, Core-Vent, and others.
Conical Abutment Attachments — What They Are and Which Systems Titan Supports
What is a conical abutment attachment and how is it different from a standard hex-connection abutment?
A conical abutment attachment is a restorative component — bar post, plastic castable coping, impression coping, or analog — designed for implant systems that use a tapered (conical) implant-abutment interface rather than a flat platform with a hex or octagon anti-rotation feature.
In a conical connection, the abutment base is machined to a precise taper that seats into a matching tapered bore in the implant body. The taper creates:
- A friction-lock (similar in principle to the Bicon locking taper, though with different geometry) that resists micromotion at the implant-abutment junction
- A self-sealing interface that reduces bacterial ingress into the internal connection
- Angular compliance — within limits, a conical seat tolerates minor misalignment better than a flat platform with a hard hex stop
- High resistance to screw loosening — the taper distributes lateral occlusal forces along the cone surface rather than concentrating them at the abutment screw
Many of the systems in Titan's Conical Abutment Attachments catalog were pioneering designs from the 1980s and 1990s that introduced conical connections to mainstream implant dentistry — well before the concept became universal. Titan continues manufacturing compatible components for all of them, making Titan one of the only sources for restorations on these implant generations still in patients' mouths today.
The components Titan provides across this category include:
- Bar posts — conical-shaped titanium posts for laser-welded bar frameworks
- Plastic castable (UCLA-style) copings — for custom abutment wax-up and casting
- Abutment analogs — for accurate lab cast replication
- Impression copings — for master impression transfer at the abutment or implant level
All conical abutment attachment screws use Titan's universal .050" hex drive — one driver for every system.
Which conical abutment systems does Titan support and what makes each one distinct?
3i Immediate Occlusal Loading (IOL) Compatible
Biomet 3i's Immediate Occlusal Loading (IOL) system was developed for protocols requiring implant-supported restorations to be loaded at or immediately after placement — before the conventional osseointegration period. The IOL abutment uses a conical abutment connection seated into a specifically designed 3i implant platform with a conical bore, providing the mechanical stability needed to withstand early occlusal loading without micromotion at the interface.
The IOL system was ahead of its time: it demonstrated that conical connections could distribute early load forces more effectively than flat-platform external hex designs, contributing to the clinical evidence base for immediate loading that is standard practice today.
Titan carries: Compatible bar posts, plastic castable copings, and analogs for the 3i IOL platform. Available at: titanimplants.com/3i-immediate-occlusal-loading-compatible/
When to use: Any patient with an existing 3i IOL implant that needs restoration or re-restoration — including immediate load protocol cases and legacy restorations requiring replacement components.
Astra Tech TX OsseoSpeed UniAbutment Compatible
The Astra Tech OsseoSpeed TX implant uses a proprietary conical seal (Morse-taper style) connection — the implant-abutment interface is a precision cone that creates a near-hermetic bacterial seal. Astra's UniAbutment is a one-piece transmucosal conical abutment available in multiple collar heights, designed to emerge from the tissue and provide the restorative platform for cement-retained crowns and bridges.
The conical seal design of the Astra connection is clinically significant: the friction-lock creates exceptional stability against rotational and lateral forces, and the sub-crestal placement philosophy (OsseoSpeed TX implants are designed for crestal or sub-crestal placement) means the UniAbutment's conical base engages deeply into the implant, minimizing the distance between the IAJ (implant-abutment junction) and crestal bone.
Titan carries: Compatible bar posts, plastic castable copings (UCLA style), impression copings, and analogs for the Astra Tech TX OsseoSpeed UniAbutment conical interface. Available at: titanimplants.com/astra-tech-tx-osseospeed-uniabutment-compatible/
When to use: Any restoration on an Astra Tech OsseoSpeed TX implant requiring a bar-retained overdenture framework or a custom-cast abutment at the UniAbutment interface.
Brånemark EsthetiCone Compatible
Nobel Biocare's EsthetiCone was one of the first dedicated esthetic anterior abutment systems — a conical, tapered abutment designed specifically to minimize the visible metal margin and support optimal soft-tissue emergence in the anterior zone. The EsthetiCone connects to Brånemark external hex implants via a 45° conical taper with an anti-rotation flat, giving it a precisely defined seating position. The conical profile allows the crown margin to be positioned at or slightly below the gingival crest with natural-looking emergence.
The EsthetiCone was primarily designed for anterior single-unit cement-retained restorations — the taper provides a natural tooth-root-like shape that the gingiva can adapt to, and the abutment can be modified to adjust the margin depth and emergence profile chairside or in the lab.
Titan carries: Compatible bar posts, plastic castable copings, and analogs for the EsthetiCone conical connection. Available at: titanimplants.com/branemark-estheticone-compatible/
When to use: Existing Brånemark RP implants restored with EsthetiCone abutments requiring replacement components; legacy anterior esthetic restorations on Nobel Biocare external hex platforms.
Impla-Med Sterngold Low Margin Compatible
Impla-Med (later acquired by Sterngold Dental) produced implants with a distinctive Low Margin conical abutment design — a tapered abutment whose base is machined to place the crown margin as close to the tissue as possible, reducing visible metal and improving gingival health around the restoration. The Low Margin design was a clinical solution to the problem of supra-gingival metal margins that were common in early implant restorations.
Sterngold, a company with a long history in precision dental components, continued and refined the Impla-Med design before eventually discontinuing the implant line. Many Impla-Med Sterngold implants remain in patients' mouths and continue to need restorative components.
Titan carries: Compatible bar posts, plastic castable copings, and analogs for the Impla-Med Sterngold Low Margin conical connection. Available at: titanimplants.com/impla-med-sterngold-low-margin-compatible/
When to use: Legacy Impla-Med Sterngold implants requiring re-restoration — Titan is often the only current source for compatible components.
Lifecore Compatible External Hex and Lifecore Fixed-Detachable Abutment Compatible
Lifecore Biomedical (later Lifecore Dental) produced a range of implants including external hex platforms (Lifecore Restore) and a specialized Fixed-Detachable (FD) abutment system. The Lifecore Fixed-Detachable system was designed for implant-supported bar-and-clip overdentures that are fixed from the patient's perspective but can be removed and serviced by the clinician — a significant prosthetic concept for managing peri-implant hygiene in full-arch overdenture cases.
The Fixed-Detachable abutment uses a conical transmucosal element that provides the height and emergence to support a bar framework. The bar then retains the overdenture via precision clip attachments.
Titan carries:
- Lifecore External Hex: Compatible bar posts, plastic castable copings, analogs, and impression copings for Lifecore Restore external hex implants
- Lifecore Fixed-Detachable: Compatible conical bar post components for the FD abutment system
Available at: titanimplants.com/lifecore-compatible-external-hex/ and titanimplants.com/lifecore-fixed-detachable-abutment-compatible/
When to use: Any Lifecore Restore or Lifecore FD implant requiring a new bar framework or replacement restorative components. The FD system is particularly important for patients with full-arch overdentures whose bar frameworks need replacement without changing the implant or abutment system.
Paragon SpectraCone Compatible
Paragon Implant (founded by Dr. Gerald Niznick, the inventor of the internal hex implant connection) developed the SpectraCone — a conical internal connection implant system that advanced the integration of conical taper and anti-rotation indexing. The SpectraCone used a conical bore with a hexagonal anti-rotation index, combining the stability of a friction-lock taper with the precision orientation of a hex — a design philosophy that would later influence many modern conical-connection systems.
Paragon implants remain in patients from the 1990s and early 2000s and continue to require restorative components. Titan carries compatible bar posts, plastic castable copings, and analogs for the SpectraCone connection geometry.
Titan carries: Compatible bar posts, plastic castable copings, and analogs. Available at: titanimplants.com/paragon-spectracone-compatible/
When to use: Legacy Paragon SpectraCone implants requiring re-restoration or overdenture bar framework replacement.
Steri-Oss External Hex Compatible
Steri-Oss (acquired by Nobel Biocare in 1999) was one of the pioneering American implant manufacturers, producing the Replace, Replace-Select Tri-Lobe, HL-Series External Hex, Flat-Top, and PME implant lines. Steri-Oss systems used external hex connections as anti-rotation features, and many of these implants were restored with conical-style bar post abutments for overdenture bar frameworks.
Nobel Biocare discontinued most Steri-Oss-specific components after the acquisition, making Titan one of the primary sources for compatible restorative parts for these implants.
Titan carries: Compatible bar posts, plastic castable copings, analogs, and impression copings for Steri-Oss external hex platforms (Flat-Top, HL-Series, Replace, Replace-Select). Available at: titanimplants.com/steri-oss-external-hex-compatible/
When to use: Any Steri-Oss implant requiring new restorative components — increasingly important as original Steri-Oss parts become harder to source elsewhere.
UMA Compatible — Universal Modification Abutment
The UMA (Universal Modification Abutment) is a conical, modifiable abutment system originally developed to provide a single abutment architecture that could be adapted to multiple implant platforms through compatible base inserts. The UMA concept was influential in establishing the idea of a universal custom abutment — a single titanium blank with a platform-specific base that could be modified by the lab to any geometry needed for the final restoration.
The UMA system uses a conical abutment profile that the lab modifies — reducing height, adjusting taper, relocating the margin — to match the specific tooth and tissue situation. It is one of the most versatile modifiable abutment designs ever produced.
Titan carries a dedicated IME/UMA Abutment Impression Coping with Long Screw (Open Tray Technique) — SKU TN-UMAIC — which captures the UMA abutment's geometry for the master impression and can subsequently be adjusted in the lab as the final custom abutment, applying Titan's dual-use impression coping approach to the UMA platform.
Titan carries: UMA-compatible abutment impression copings (TN-UMAIC), bar posts, analogs, and plastic castable copings. Available at: titanimplants.com/uma-compatible-universal-modification-abutment/
When to use: Cases on UMA-compatible implant platforms requiring custom abutment fabrication, overdenture bar frameworks, or replacement impression copings for existing UMA abutments.
ZimVie 3i External Hex Compatible (Conical Abutment Category)
ZimVie / Biomet 3i external hex implants — available in 3.4mm, 4.1mm, 5.0mm, and 6.0mm seating surface diameters — are the most widely placed implant platform in North America. While the 3i external hex is primarily a hex-engagement platform, Titan's Conical Abutment Attachments catalog for this system covers conical-profile bar posts and castable copings with conical geometries used specifically for overdenture bar frameworks and fixed-detachable restorations on 3i External Hex implants.
These are distinct from Titan's standard straight abutments and Simple Step Abutments for 3i — the conical bar post profile is the appropriate geometry for laser-welded hader bar frameworks, where the post's tapered shape integrates with the bar design.
Titan carries: Conical bar posts, plastic castable copings, and analogs for ZimVie 3i External Hex (all seating surface diameters). Available at: titanimplants.com/zimvie-3i-external-hex-compatible-8/
How do I know which type of conical abutment attachment I need?
Three questions determine the right component:
-
What implant system is in the patient? Identify the manufacturer, product line, and platform diameter. If you're unsure, Titan's Customer Service can often identify the system from a description, periapical radiograph, or the implant body shape — call (201) 439-0470.
-
What restoration is being planned?
- Bar framework (overdenture or fixed-detachable): You need a bar post in the correct conical geometry for the system
- Custom single crown or bridge: You need a plastic castable (UCLA-style) coping and matching analog
- Definitive impression: You need a conical abutment impression coping matched to the system
-
Is the original abutment still in place? If so, bring the original abutment or coping to the appointment — Titan can match the geometry from the existing component description or a photograph.
For all conical abutment attachment questions, contact Customer Service at (201) 439-0470 or support@titanimplants.com — our team is experienced in identifying legacy system components and will confirm the right part before you order.
Legacy and Discontinued Implant Systems
Can I get parts for an older implant that is no longer manufactured?
Very likely yes. Titan Implants continues manufacturing compatible components for dozens of legacy and discontinued implant systems — a service most other suppliers have discontinued. If you have a patient with an older implant that needs restoration, we are often the only source for compatible attachments.
Key legacy systems we support include: Core-Vent (post-1991 and Titanium Straight Insert), IMZ (Original Internal Non-Engaging, Interpore), Steri-Oss (Flat-Top Non-Hex, HL-Series External Hex, PME Transmucosal, Replace External Hex, Replace-Select Tri-Lobe), Calcitek (Spline, Shouldered, Threadloc External Hex, Integral, Omniloc), Paragon/Centerpulse (Taper-Lock, Screw-Vent, Tapered Screw-Vent, AdVent, Spectra Cone), Impla-Med Sterngold, BioLok External Hex, Innova Endopore, Lifecore Restore, OIC, IMTEC, and more.
To find parts for a specific legacy implant, contact Customer Service at (201) 439-0470 with the manufacturer name, system name, and implant platform diameter if known.
Educational Resources
Does Titan Implants offer educational or instructional videos?
Yes. Titan Implants maintains a library of instructional videos covering product workflows for key product lines, accessible at:
titanimplants.com/educational-videos/
Covered topics include (by video number):
- Titan Implant Bar Post use — Video 8
- Ball Head Abutment use — Videos 3 and 4
- Implant Locator Pin — dedicated instructional video
- Platform-specific workflow videos for Zimmer, Biomet 3i, and other systems
Does Titan Implants publish a product catalog?
Yes. A full product catalog is available at titanimplants.com/store-videos-catalogs/. The online store at titanimplants.com/implant-systems-compatibles/ is organized by implant system and platform, allowing direct browsing by manufacturer.
Ordering, Shipping & Returns
How do I place an order?
Online at titanimplants.com or by phone at (201) 439-0470, Monday–Friday, 9am–5pm EST. Have your customer number, catalog number (SKU), and quantity ready for phone orders.
What is your order cut-off time?
Orders placed by 4:00 pm EST on business days are processed the same day. Orders after 4:00 pm, on weekends, or on federal holidays begin processing the following business day. Orders placed Friday after 5:00 pm EST begin processing Monday.
Can I cancel an order after placing it?
Stock orders can usually be cancelled before shipment — call immediately. Custom and special-order items cannot be cancelled once production has started except with Titan's prior written consent.
Do you offer volume pricing?
Yes. Contact sales@titanimplants.com to discuss volume pricing for high-use practices and dental labs.
How does shipping work?
All orders ship via FedEx with signature required — someone must be present to sign. Free standard shipping on qualifying online orders over $199 within the continental USA, shipped from our Bergenfield, NJ facility. Additional charges apply for Hawaii, Alaska, and extended service areas.
Do you ship internationally?
Yes, with exceptions. International orders do not qualify for free shipping. Import duties, taxes, and customs fees are the buyer's sole responsibility. Titan Implants does not ship to certain restricted countries — check our International Customers page or contact us before ordering.
What is your return policy?
Products must be returned or exchanged within 30 days of the invoice date for credit, minus original shipping costs, handling, and a 25% restocking fee. Returns must be in original, unopened, undamaged packaging; not clinically used; shipped within one week of receiving an Authorized Return Number (ARN); and shipped via traceable carrier (FedEx, UPS, or DHL) with the ARN labeled on the outside.
Not returnable: final-sale items, clinically used items, custom/special-order items.
How do I start a return?
Online: My Account → Completed Orders → find the order → click Return Item(s) → select quantity and reason → submit. You'll receive an ARN by email.
Phone: (201) 439-0026, Monday–Friday, 9am–5pm EST.
Contact & Support
Titan Implants, Inc. 18 Columbia Avenue, Bergenfield, NJ 07621, USA
| Orders | (201) 439-0470 |
| Customer Service / Returns | (201) 439-0026 |
| General Support | support@titanimplants.com |
| Sales / Volume Pricing | sales@titanimplants.com |
| Hours | Monday–Friday, 9:00 am–5:00 pm EST |
| Language | All correspondence in English, please |
"All our implants and attachments are proudly made in NJ, USA."
Educational Videos: titanimplants.com/educational-videos/ Locator Pin SKU List: titanimplants.com/titan-implants-locator-pins/ Full Product Catalog: titanimplants.com/implant-systems-compatibles/ Blog: titanimplants.com/blog/
|
Note: All pictures are not sized to scale. All prices are in USD. All prices and product availability subject to change without prior notice. Titan Implants® is a trademark of Titan Implants, Inc., | ||||||
|
Branemark System®, MirusCone™ and EsthetiCone®, Sterioss®, Nobel Active®, and NobelReplace®, Tapered and Straight Groovy, Nobel Speedy®, Replace™, Replace Select™ Tapered and Straight, Sterioss™, HL Series, Flat Top, Replace™ External Hex, Unigrip, WP, and RP are registered trademarks of Nobel Biocare. 3i®, Biomet®, Biomet 3i™, Certain®, Miniplant®, NanoTite™, Osseotite®, Osseotite XP® and Prevail®, MicroMiniplant®, and Immediate Occlusal Loading® are trademarks of Biomet 3i, Inc. 3i TG® is a registered trademark of 3i Implant Innovations Inc. Frialit-2®, XIVE®, and Friadent® are registered trademarks of Dentsply Friadent Group. OTI Systems® is a registered trademark of Osteo- Implant Corporation. Micro-Lok® and Silhouette Laser-Lok® are registered trademarks of Bio-Lok International Inc. IMTEC®, Endure® and Universal® Implants are registered trademarks of Imtec 3M Corporation. Lifecore® is a registered trademark of Lifecore Biomedical Group. Lifecore®, RESTORE, SD, RD, WD, Renova®, SDI, WDI, Stage-1, RDS, and WDS are registered trademarks of Keystone Dental. Solid Abutment, SCS, and SynOcta® are registered trademarks of ITI-Straumann®. Screw-Vent®, Tapered Screw-Vent®, Spectra Cone®, Tapered Collar®, Advent®, Taper-Lock®, SwissPlus®, and Micro-Vent™, Bio-Vent®, Core-Vent®, Spectra Cone®,(The Spectra System®) are registered trademarks of Paragon Dental. Paragon®, Screw-Vent®, Tapered Screw-Vent®, Advent®, SwissPlus®, and Spline® Implants are registered trademarks of Zimmer Dental. One Stage®, and Endopore ® are registered trademarks of Innova Corporation. BioHorizons™ is a trademark of BioHorizons USA Implant Systems Inc. Sterioss, HL Series, Flat Top, Replace, Replace-Select, are registered trademarks of Nobel Biocare AB. IMZ® is a registered trademarks of FRIATEC systems. MicroThread™ and Conical Seal Design™ are registered trademarks of Astra-Tech Dental. Astra Tech Inc. is a registered trademark of DENTSPLY Implants. Bicon™ is a registered trademark of Bicon Dental Inc. INTEGRAL® and OMNILOC® are registered trademarks of Calcitek®. Spiralite® and Bonelock® Implants, Rootform® Flat Top Abutments and Hex-Top Abutments are registered trademarks of Swiss Implants Inc. Sterngold-ImplaMed® is a trademark of Sterngold Dental, LLC. American Dental Implant is a trademark of American Dental Implant Corporation. |
||||||
| Contact Us at : 1-201-439-0470 Or call us at : 201-439-0026 Customer service hours 8:30am - 6:00pm EST, Monday through Friday (Our clients are dentists and lab technicians. We do not work with patients.) |
||||||
We ship by  |
We Accept  |
|||||
Copyright 2026 Titan Implants, Inc. - All rights reserved.