 Loading... Please wait...
- Home
- Shop Products
-
Resources
- 3i compatible external hex abutment selection guide
- Bicon Compatible Abutment Selection Guide
- ZimVie TSX and TSV compatible abutment selection guide
- 3i certain compatible abutment selection guide
- Implant Locator Pin Guide
- Why Titan Implants
- The One Driver Advantage
- Signature Products
- Selection Guides
- Specialty Solutions
- FAQ
-
Educational Videos
- Company
- President's Statement
-
Contact Us
Shop Products
Implant Systems
Biomet 3i Compatible
Nobel Biocare Compatible
Zimmer Dental & ZimVie Compatible
ITI-Straumann Compatible
BioHorizons Compatible
Astra Tech Compatible
Bicon Compatible
Friadent Frialit and XiVE Compatible
STERI-OSS Compatible
Calcitek Compatible
Keystone (Lifecore) Dental Compatible
Core-Vent Compatible
Paragon Compatible
Centerpulse Compatible
IMZ Compatible
IMTEC Systems Compatible
BioLok Compatible
Innova-Corp Compatible
Impla-Med Sterngold Compatible
Osteo Implant Corporation Compatible
( ADI ) American Dental Implant Corp. Compatible
Swiss Implants, Inc. Compatible
The Spectra System Compatible
Shop by Component
Abutments & Attachments
- All abutments & attachments
- Straight Abutments
- Multi-Unit Abutments
- Multi-Unit Abutment Attachments (NB Interface)
- Conical Abutment Attachments
- Modifiable Preppable Abutments
- Titan Design Ex Hex Simple Step Abutments
- Temporary Abutments
- Titanium Bar Abutments for Laser Welding
- Overdenture Ball Abutments
- Non-Engaging Post Abutments One Piece
- Solid Abutments for Tissue Level Implants
Healing & Surgical
Impression & Lab Components
Accessories & Extras

- Home
- Implant Systems & Compatibles
- Paragon Compatible
- 4.1mm Taper-Lock External Hex Compatible
- Straight Locking Implant Abutments
- Paragon Taper-Lock External Hex Compatible Straight Locking Implant Abutments with Ti. screw (Profile DIameter: 5.0mm) (TNS-4SLIAF)
Paragon Taper-Lock External Hex Compatible Straight Locking Implant Abutments with Ti. screw (Profile DIameter: 5.0mm) (TNS-4SLIAF)



Product Description
Recommended Accessory
The Titan Implant Locator Pin seats components where access is restricted and checks implant parallelism. See it in use.
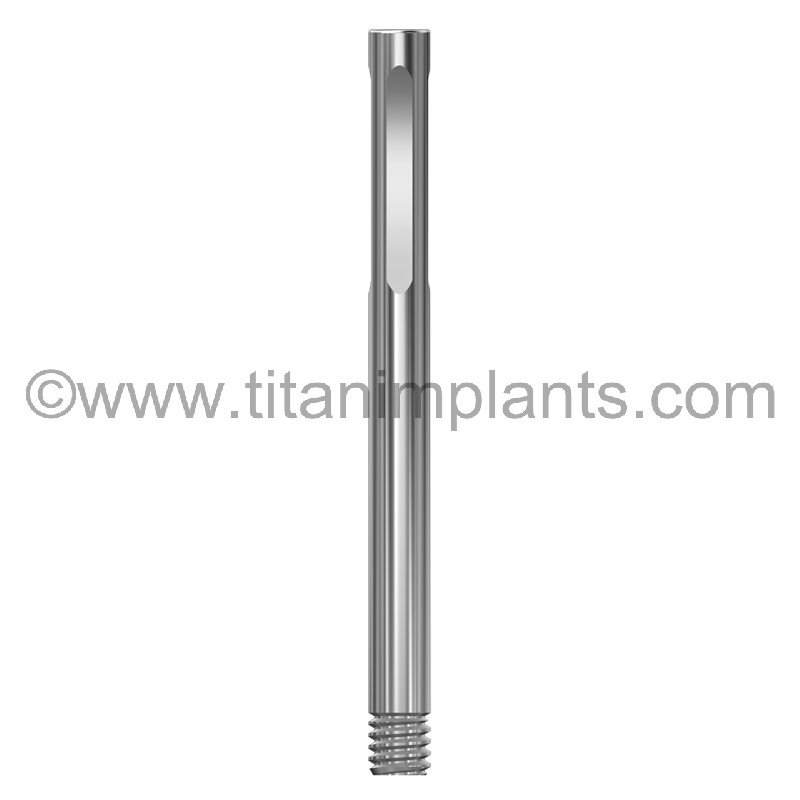
Titan Implant Locator Pin (M2-ILP-20)
Note*Abutment available in locking only
Titan’s abutments carry a wide range of emergence profiles which
contribute to a natural restoration.
Different cuff heights from 1.0mm to 5.5mm in 1/2mm increments. (Titan EXCLUSIVE)
Note: This product uses a 0.050" Hex Screw Driver.
3. How to create emergence profile by using Titan Implants' stock abutment
https://titanimplants.com/educational-videos/
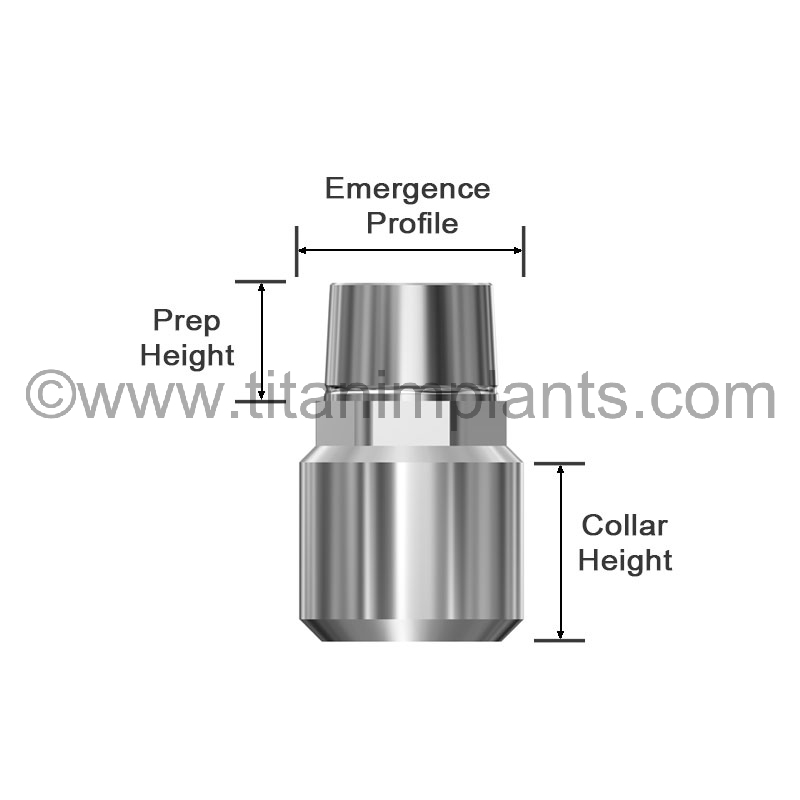
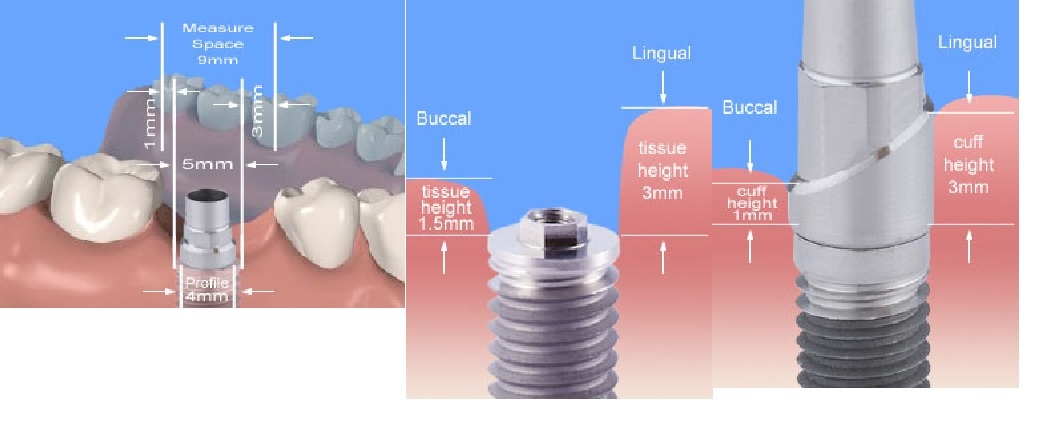
Choosing Proper Abutment Profile Diameters
Measure the available space between the proximal surfaces of the teeth adjacent to the
edentulous area.
Subtract two millimeters since it is necessary to have at least one millimeter between the abutment flare and the adjacent root surface. This will give you the maximum abutment diameter for the available space.
If more than 1mm is available on each side choose a larger Emergence Profile diameter. There are three levels of Emergence profile diameters for each abutment system: level 1 (Emergence Profile), level 2, and level 3. (See the chart)
Choosing the Proper Collar Height
Measure the distance between the implant platform and the crest of the gingival on the lingual and the buccal. Choose the highest number. Note: Usually the buccal is the
highest number. Subtract ½ or 1mm from this number. This will ensure that the collar is slightly below the crest of the gingiva. Choose the closest collar height from the chart.
If the collar height is different between the buccal and lingual and you wish to follow the
contour of the gingiva, modify the collar appropriately.
TIP: The best results are obtained taking a tissue model impression of the implant using a
transfer coping. The lab can then easily choose and modify the proper abutment for the available space.
Other Details
Add to Wish List
You Recently Viewed...
|
Note: All pictures are not sized to scale. All prices are in USD. All prices and product availability subject to change without prior notice. Titan Implants® is a trademark of Titan Implants, Inc., | |||||
|
Branemark System®, MirusCone™ and EsthetiCone®, Sterioss®, Nobel Active®, and NobelReplace®, Tapered and Straight Groovy, Nobel Speedy®, Replace™, Replace Select™ Tapered and Straight, Sterioss™, HL Series, Flat Top, Replace™ External Hex, Unigrip, WP, and RP are registered trademarks of Nobel Biocare. 3i®, Biomet®, Biomet 3i™, Certain®, Miniplant®, NanoTite™, Osseotite®, Osseotite XP® and Prevail®, MicroMiniplant®, and Immediate Occlusal Loading® are trademarks of Biomet 3i, Inc. 3i TG® is a registered trademark of 3i Implant Innovations Inc. Frialit-2®, XIVE®, and Friadent® are registered trademarks of Dentsply Friadent Group. OTI Systems® is a registered trademark of Osteo- Implant Corporation. Micro-Lok® and Silhouette Laser-Lok® are registered trademarks of Bio-Lok International Inc. IMTEC®, Endure® and Universal® Implants are registered trademarks of Imtec 3M Corporation. Lifecore® is a registered trademark of Lifecore Biomedical Group. Lifecore®, RESTORE, SD, RD, WD, Renova®, SDI, WDI, Stage-1, RDS, and WDS are registered trademarks of Keystone Dental. Solid Abutment, SCS, and SynOcta® are registered trademarks of ITI-Straumann®. Screw-Vent®, Tapered Screw-Vent®, Spectra Cone®, Tapered Collar®, Advent®, Taper-Lock®, SwissPlus®, and Micro-Vent™, Bio-Vent®, Core-Vent®, Spectra Cone®,(The Spectra System®) are registered trademarks of Paragon Dental. Paragon®, Screw-Vent®, Tapered Screw-Vent®, Advent®, SwissPlus®, and Spline® Implants are registered trademarks of Zimmer Dental. One Stage®, and Endopore ® are registered trademarks of Innova Corporation. BioHorizons™ is a trademark of BioHorizons USA Implant Systems Inc. Sterioss, HL Series, Flat Top, Replace, Replace-Select, are registered trademarks of Nobel Biocare AB. IMZ® is a registered trademarks of FRIATEC systems. MicroThread™ and Conical Seal Design™ are registered trademarks of Astra-Tech Dental. Astra Tech Inc. is a registered trademark of DENTSPLY Implants. Bicon™ is a registered trademark of Bicon Dental Inc. INTEGRAL® and OMNILOC® are registered trademarks of Calcitek®. Spiralite® and Bonelock® Implants, Rootform® Flat Top Abutments and Hex-Top Abutments are registered trademarks of Swiss Implants Inc. Sterngold-ImplaMed® is a trademark of Sterngold Dental, LLC. American Dental Implant is a trademark of American Dental Implant Corporation. |
|||||
| Contact Us at : 1-201-439-0470 Or call us at : 201-439-0026 Customer service hours 8:30am - 5:00pm EST, Monday through Friday (Our clients are dentists and lab technicians. We do not work with patients.) |
|||||
We ship by  |
We Accept  |
| |||

Copyright 2026 Titan Implants, Inc. - All rights reserved.
